This section describes the field types you may encounter when entering or modifying data and what kind of data you can enter in the different field types.
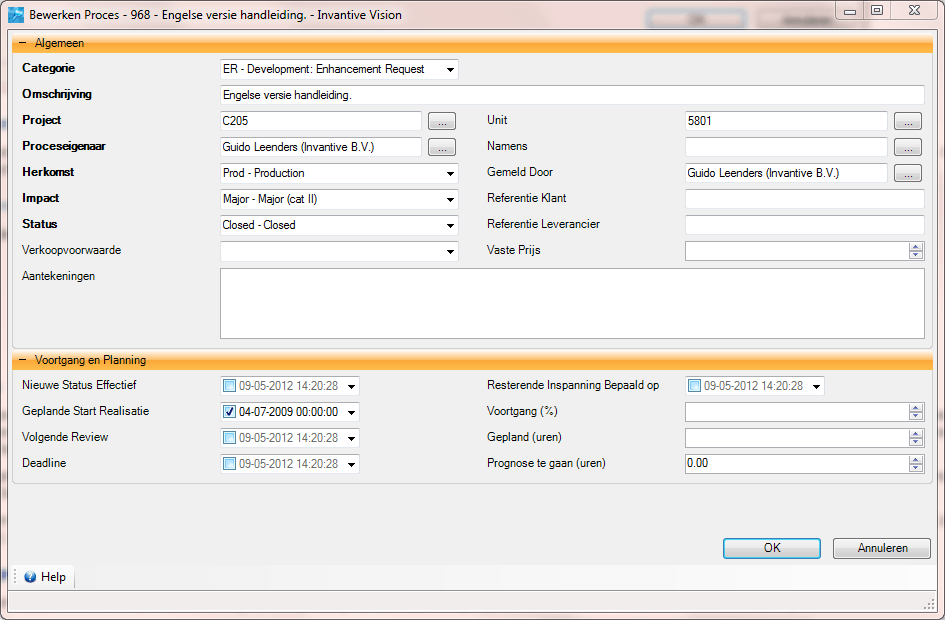
As example we take the screen ‘Edit Process‘.

Entry Fields
An example of an entry field is the white field next to ‘Description‘. In a field like this you can enter a ‘free text’. This means you can choose - within certain boundaries - what you fill in. In the example of ‘Description‘ you can for example enter a short description of the subject of the process.
Required fields
The fields which are shown bold are required fields. Examples of these fields are ‘Category‘, ‘Description‘, ‘Project‘, ‘Process Owner‘, etc.

Amounts
All amounts are in Euros and will be written in the European way. This means that thousands are separated by a period and that the separation of whole and decimal numbers is shown by a comma. For instance: 123.456,78. If you use an American version of other software you have to pay attention to not change the way of writing numbers. The American way of noting numbers is the exact opposite of our way, for example 123,456.78.
If you enter a number with a decimal, you need to use the comma key (‘,‘). All points are considered thousands separators and are not looked at regardless of the place of the number. An input of ‘8.5’ is therefore treated as ‘85’.
The amounts you enter are left aligned. This means these can be found on the left side of the field. If the amounts are already entered, they are automatically right aligned. If you, for example, in the screen section, where you can search, enter a number you will see that the number is left aligned.
Percentages
Further more there are fields where a certain percent is askesd (like with ‘Progress(%)‘). You do not need to enter the percentage sign here.

Dates
If a date is being asked (For example: ‘Date Start Realization’) you can fill this in yourself. The allowed date format is dd-mm-jjjj. The input mask prevents the input of an invalid value. An example of an invalid value is month number 22 or day number 33.
The meaning of the date format is the following:
•‘dd’ indicates a two digit format of the day of the month from ‘01’ to ‘31’.
•‘mm’ indicates a two digit format of the month in the year where ‘01’ stands for January, ‘02’ stands for February .. etc..
•‘yyyy’ indicates a four digit format of the year, for example ‘2009’.
You can also click on the small square next to the input field:

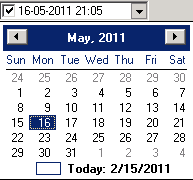
A calendar appears:

Select the day by clicking on one of the numbers in the calendar. If you select ‘today’ automatically the current date will be used. The month is changeable by clicking on one of the black arrows, which can be seen on the picture below. The arrow to the right means a month forward. The arrow to the left means a month backward.

If you want more than only change the day, you have to ensure that you change the day at the end. This is because after changing the day you will come back to the menu.
After you have entered a data or selected one by using the calendar, the checkbox left in the date field is checked. This means that a data is selected. If you do not wish to use the date field, click on the checkbox left in the date field. The checkbox is then unchecked and the data in the field will turn light grey.

Times
When asked to enter a time, the following input format can be used:uu:mm.
In this case the abbreviation ‘mm’ is minutes and not months as in the date format, ‘uu’ stands for hours.
Date Time Fields
In date/time fields, first the date is entered and subsequently the time. The distinction between date and time is indicated by a space. The above given input formats show the way the date and time can be entered.
Drop Boxes
With drop boxes only valid choices can be made. A drop box works as follows: the field next to ‘Impact’ in the image below for example, is a drop box. As you can see something has already been entered: ‘Low - Completely usable’.

You can change the content of this drop box by clicking on the little square. This opens the drop box and it will get the shape of the following image:

Now you can choose from four values: ‘Low - Completely usable’, ‘N.A. - Not applicable’, ‘Average - Limited use’ and ‘Severe - No longer usable’. To choose you click on one of the possibilities. The drop box closes itself and your choice is recorded.
Check boxes
A final way to enter data in the screens is via check boxes. This is used when there are only two options: yes or no. If you check the box, you choose ‘yes’ and vice versa. An example of a check mark you can see in the image below:

The check is done by clicking on the white square or in the accompanying text or by selecting the white square with the cursor and then pressing the space bar. The field will look as follow:

 Invantive Estate